10 Best Press Fit Bottom Bracket Tools for Easy Installation and Removal
Installing and removing press fit bottom brackets can often be a challenging task for both amateur and professional cyclists alike. The complexity of the process requires the right tools to ensure a seamless experience, and this is where a reliable press fit bottom bracket tool becomes essential. These tools not only provide the necessary leverage but also ensure that the installation and removal are done without damaging the bottom bracket shell or the frame.
In the realm of cycling maintenance, understanding the right equipment to use is crucial for achieving optimal bicycle performance. A high-quality press fit bottom bracket tool can simplify the task, making it quick and efficient while avoiding the common pitfalls associated with improper fittings. In this article, we will explore the top ten press fit bottom bracket tools available, focusing on their features, ease of use, and overall effectiveness for enhancing your bike maintenance arsenal. Whether you're a seasoned cyclist looking to upgrade your toolkit or a beginner trying to take on your first installation, having the right press fit bottom bracket tool can make all the difference in your cycling experience.
Understanding Press Fit Bottom Brackets and Their Importance
Press fit bottom brackets are a critical component in modern bicycle design, providing a streamlined integration of the crankset into the frame. They offer several advantages over traditional threaded bottom brackets, including a reduced weight and a cleaner aesthetic. The press fit design allows for a wider variety of frame materials, enhancing the versatility and performance of bicycles tailored for different riding styles and disciplines.
The significance of these bottom brackets extends beyond their installation. They are designed to accommodate various crankset standards and to ensure a secure fit that enhances overall efficiency. Properly installed press fit bottom brackets minimize the chances of creaking and shifting, contributing to a smoother riding experience. Furthermore, understanding the specifics of press fit systems allows cyclists and mechanics to select the right tools for installation and removal, ensuring longevity and reliability in high-performance cycling applications. As a result, mastering the intricacies of press fit bottom brackets is essential for anyone looking to optimize their bicycle's functionality.
Key Features to Look for in Bottom Bracket Tools
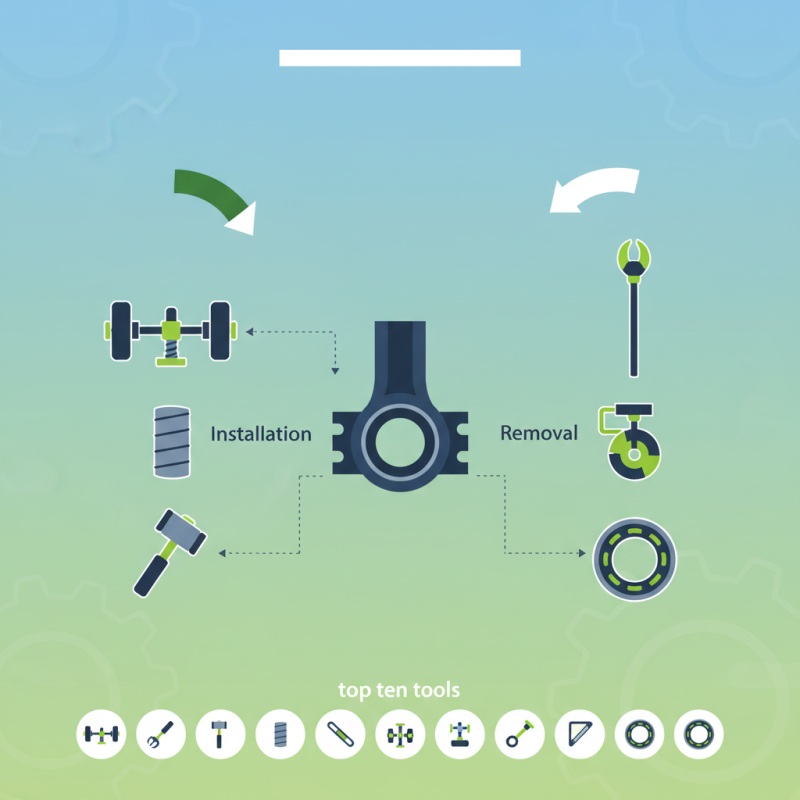
When selecting bottom bracket tools, there are several key features to consider that can significantly enhance the ease of installation and removal. First, compatibility is crucial; ensure that the tool is designed to fit a variety of bottom bracket sizes and standards. A versatile tool will save you from having to purchase multiple devices for different bike models. Additionally, look for tools that offer good leverage, as this can make loosening or tightening components much simpler, especially when dealing with stubborn or tightly installed brackets.
Another important feature is the material and build quality. Durable materials such as hardened steel can withstand the stresses of regular use and prevent wear and tear over time. Ergonomic designs also play a vital role in improving the user experience. Comfortable handles allow for better grip and reduced hand fatigue, enabling you to work more efficiently. Lastly, consider whether the tool is easy to store and transport, as well as if it comes with clear instructions or markings to streamline the installation process even further. These features can significantly enhance the performance of your bottom bracket toolset.
10 Best Press Fit Bottom Bracket Tools for Easy Installation and Removal
Top 10 Press Fit Bottom Bracket Tools for Efficient Use
When it comes to maintaining your bicycle, having the right tools for the job is essential, particularly when it comes to installing and removing press fit bottom brackets. The top tools in this category are designed to provide precise alignment and efficient operation, making the process smoother and more reliable. A high-quality press fit bottom bracket tool ensures that the installation goes off without a hitch, allowing you to focus on optimizing your ride rather than struggling with cumbersome equipment.
Efficient use of these tools not only saves time but also minimizes the risk of damaging the bike components. Tools that are ergonomically designed provide a better grip and reduce fatigue during the installation process. Additionally, many of these tools feature modular designs that allow for compatibility with various bottom bracket sizes, enhancing their versatility. By selecting the right press fit bottom bracket tool, you invest in a smoother, hassle-free maintenance routine that can significantly extend the lifespan of your bike's drivetrain.
Step-by-Step Guide to Installing and Removing Bottom Brackets
Installing and removing bottom brackets can be daunting for many cyclists, but with the right tools and a step-by-step approach, the process can be manageable. The first step in installing a bottom bracket is to prepare your frame. Ensure that the shell is clean and free from debris, as any particles can affect the fit and performance of the bottom bracket. Next, grease the threads of the bottom bracket to ensure smooth installation and prevent future seize-ups.
When it comes to installation, begin by aligning the bottom bracket with the shell, applying firm but gentle pressure as you turn it into place. Use a press fit bottom bracket installation tool to achieve an even and secure fit. It is vital to ensure that the bottom bracket is pushed evenly into the frame to avoid misalignment, which can lead to performance issues. Once installed, double-check for any unwanted movement or noise by rotating the crankset.
For removal, start by securely placing your bike in a stand to prevent any movement. Utilize the same press fit tool, ensuring that it is properly positioned against the bottom bracket. Gradually apply pressure while turning the tool in the appropriate direction. Patience is key; avoid rushing the process to prevent damaging the frame or the bottom bracket itself. Once it's free, clean the area thoroughly before fitting a new bottom bracket, ensuring a smooth transition for your next cycling adventure.
Maintenance Tips for Prolonging the Life of Bottom Bracket Tools
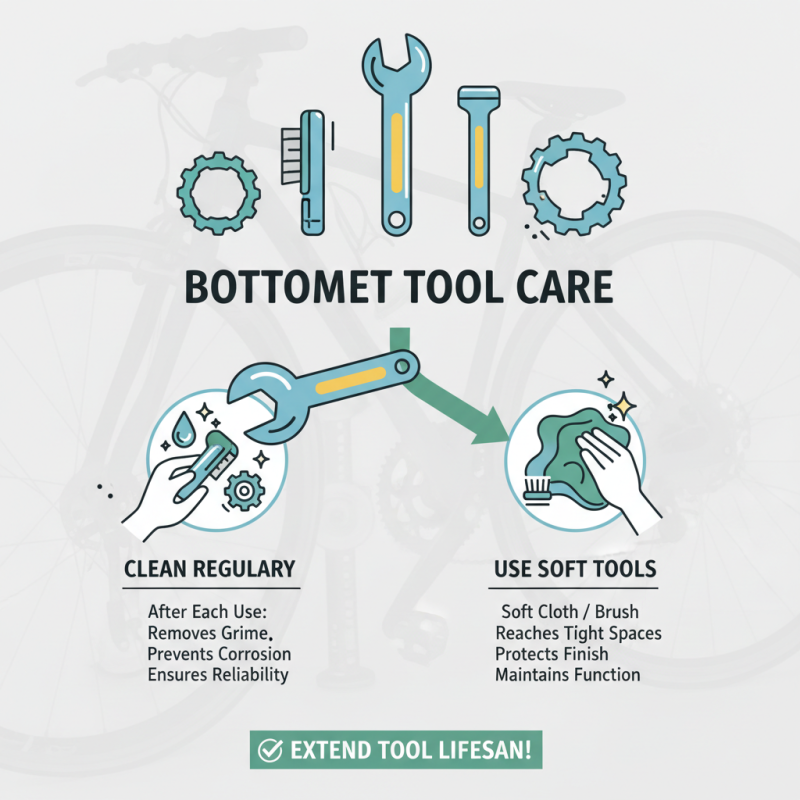
When it comes to maintaining your bottom bracket tools, proper care can significantly extend their lifespan and ensure they stay reliable for all your cycling needs. One of the most effective tips is to clean your tools regularly after each use. This prevents grime and debris buildup which can lead to corrosion and malfunction over time. Utilizing a soft cloth or brush can help reach tight spaces without damaging the tool’s finish or functionality.
Another essential maintenance tip involves lubrication. Applying a light coat of oil to the moving parts of your tools can minimize friction and wear. However, be cautious not to over-lubricate, as excess oil can attract dirt and grime, negating your efforts. Additionally, storing your tools in a dry, organized space will prevent unnecessary damage and keep them in top condition, ensuring they are ready for use whenever you need them.