How to Design a Single Level Go Kart Track?

Designing a single-floor circuit seems simple until braking zones, queues, barriers, and emergency access compete for space. Single‑Level Go‑Kart Track Design must balance speed, visibility, capacity, and operational control. A flat layout can improve supervision, but it can also create repetitive corners and limited visual variety. That weakness deserves attention.

Industry evidence supports careful planning. The TEA/AECOM 2023 Global Attractions Attendance Report recorded strong attendance recovery across major attractions. This signals renewed demand for compact entertainment venues. However, attendance alone does not guarantee a successful karting facility. The International Association of Amusement Parks and Attractions emphasizes guest experience, operational readiness, and safety management in its industry guidance. ASTM F2970 also provides recognized practices for amusement rides and devices, including go-kart facilities. Local building, fire, accessibility, and occupational requirements still control the final design.

This guide explains how to shape a practical single-level track from the ground up. It examines site dimensions, track width, corner radii, overtaking opportunities, pit-lane separation, and spectator sightlines. Picture a 120-meter circuit with a slow hairpin near the marshal station, a clear pit entry, and protective barriers that do not hide the apex. Small details matter. A poorly placed column, glare on the racing surface, or narrow queue gate can disrupt the entire operation. Some design decisions may remain debatable, especially when land costs conflict with generous run-off areas. That tension should be documented, tested, and reviewed by qualified engineers and experienced operators before construction.
How to Design a Single Level Go Kart Track?

Define the Track’s Purpose, Users, and Operating Requirements

How to Design a Single Level Go Kart Track?

Define the track’s purpose before drawing corners or choosing barriers. Is it for casual family driving, advanced practice, or timed competition? Each purpose changes the layout, speed profile, staffing, and maintenance plan. Identify the main users by age, experience, height, and confidence. Beginners need clear sightlines, forgiving turns, and enough runoff space. Experienced drivers may expect tighter corners and technical changes in direction. A first draft is rarely right. Walk the proposed route and imagine a slow driver entering every bend.

Operating requirements should guide every design decision. Plan separate areas for registration, briefing, vehicle checks, pit access, and emergency response. Staff must see most of the track from safe observation points. Keep passing zones limited and easy to supervise. Surface drainage matters, even on a flat site. Water near a braking area can change grip within minutes. Use durable barriers, visible signals, controlled entry points, and pedestrian routes that never cross active driving space. Confirm dimensions, surface specifications, and safety provisions with qualified track engineers and local authorities.

Tips: Mark the layout with cones first. Run several test sessions with different users. Record braking points, queues, blind spots, and confusing signs. Leave more space than your drawing suggests. It is easy to underestimate recovery areas. Review the design after real operation, because driver behavior may expose problems that plans cannot predict.

Select a Safe Site and Map the Available Track Area

A safe site is the foundation of a single level go-kart track. Choose firm, stable ground with clear visibility and reliable drainage. Avoid steep slopes, loose soil, flood-prone areas, and locations close to uncontrolled public access. I walk the property before drawing anything. This reveals hidden ditches, tree roots, standing water, and maintenance problems that aerial images can miss.

Keep emergency vehicles, staff, and visitors separated from racing traffic. Provide a wide access route near the track perimeter, with no sharp obstruction at the entrance. Check lighting, noise exposure, nearby buildings, and weather patterns during different hours. A qualified site engineer should review soil conditions, drainage, barriers, and surface preparation. Local safety requirements must guide the final design.

Map the available area using a measured survey, not rough guesses. Mark property boundaries, utility lines, restricted zones, spectator areas, and service paths. Then draw the track at scale, including braking zones, runoff space, marshal positions, and sightlines between corners. I prefer testing several layouts with temporary markers before construction. My early designs often used too much space near the start area. That mistake reduced runoff at the final turn. Leave room for changes. Real sites rarely match the first drawing perfectly. Check every corner from a driver’s eye level, because a clean plan can still hide a dangerous blind spot.

How to Design a Single-Level Go-Kart Track: Site Area Allocation

A safe layout begins by mapping the available land before drawing the racing line. This example uses a 6,000 m² site and reserves space for the track, run-off areas, pit facilities, and service access.

The largest share is assigned to the track surface, while run-off zones provide space for controlled deceleration and recovery. Actual proportions should be verified against local regulations, vehicle speeds, drainage needs, and emergency-access requirements.

Plan the Track Layout, Corners, Straights, and Driver Flow

How to Design a Single Level Go Kart Track?

Plan the Track Layout, Corners, Straights, and Driver Flow

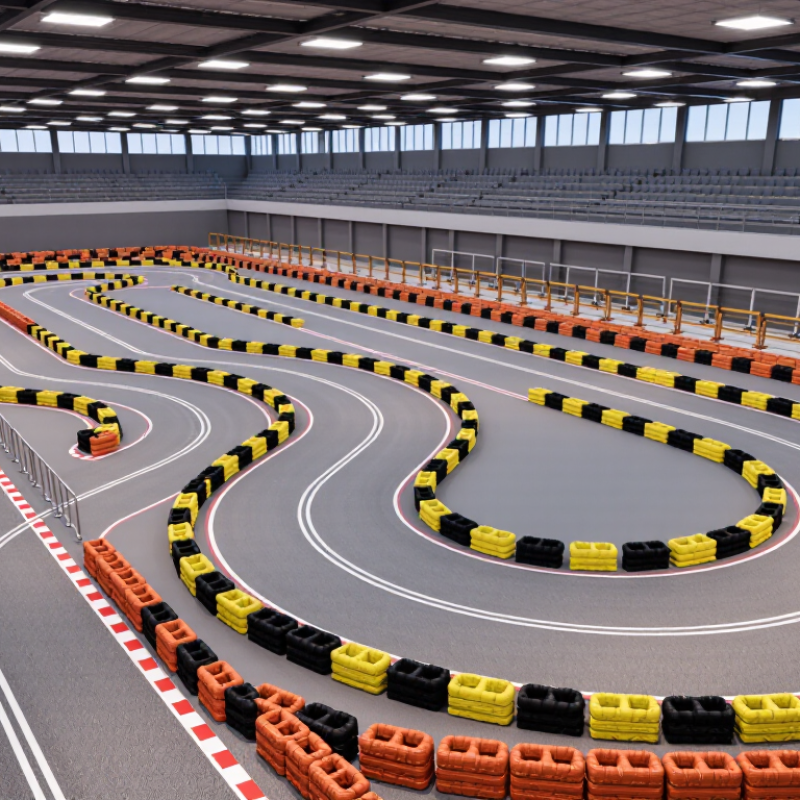
A single-level kart track should feel readable from the first lap. Sketch the pit exit, main straight, braking zone, and return line before adding decorative corners. CIK-FIA circuit guidance commonly uses about seven metres as a minimum track width. A wider start area can reduce early congestion. Keep the main straight long enough for speed, but avoid creating an overly dominant passing lane. Track flow matters more than maximum length.

Use different corner types to shape driver decisions. A tight hairpin rewards late braking, while a medium-radius bend tests throttle control. Link corners with short straights to prevent repetitive driving. A practical layout may include one technical section and one faster section. Keep sightlines open between corner entries and exits. Drivers should see the next decision early. Small elevation changes are unavailable here, so use geometry and visual markers instead.

Safety zones need equal attention. The WHO Global Status Report on Road Safety 2023 records approximately 1.19 million annual road deaths worldwide. A kart circuit is controlled, but that figure reinforces the value of conservative separation and clear escape areas. Follow current circuit regulations for barriers, runoff, marshal access, and surface grip. Do not place tire walls where a spinning kart can rebound toward traffic. Separate pit flow from the racing line with a visible, low-conflict entry. A perfect lap is not the goal. I would test the layout with cones first, because the fastest drawing often feels confusing on track.

How to Design a Single Level Go Kart Track? — Track Layout, Corners, Straights, and Driver Flow
Track Element Practical Planning Range Balanced Concept Value Design Guidance and Driver-Flow Considerations
Track Length 600–1,000 m 750 m A 750 m layout provides enough time for overtaking, corner variety, and lap-time improvement without creating excessive walking or supervision distances.
Usable Track Width 6–8 m 7 m Seven metres gives two karts more passing flexibility while maintaining a manageable surface area for barriers, drainage, and maintenance.
Track Direction Clockwise or counterclockwise One fixed direction Use one direction during each operating session. A single flow direction simplifies marshal positioning, pit access, signage, and incident response.
Number of Corners 8–14 corners per lap 11 corners Combine slow, medium, and fast corners so drivers must manage braking, turn-in, apex control, and acceleration rather than repeating one maneuver.
Hairpin Corners 1–2 corners; 6–12 m inside radius One 180° hairpin A single hairpin creates a clear braking challenge and overtaking opportunity. Provide enough exit width to reduce contact during acceleration.
Medium-Speed Corners 4–6 corners; 10–20 m inside radius Five corners Medium-speed turns should reward a smooth racing line and maintain momentum. Avoid placing every corner at the same radius or angle.
Fast Sweepers 1–3 corners; 20–35 m inside radius Two sweepers Fast corners add rhythm and variety. Their final geometry, barrier placement, and runoff must be checked against the actual kart speed and local safety requirements.
Longest Straight 80–180 m 120 m A straight of approximately 120 m allows drivers to build speed and creates a natural overtaking zone before a clearly visible braking corner.
Secondary Straights 25–80 m Three sections Short and medium straights separate corner groups, improve driver recovery time, and prevent the circuit from feeling like one continuous technical section.
Braking Zone 25–60 m approach area One major zone plus two minor zones Place the main braking zone at the end of the longest straight. Keep the entry line visible and avoid hiding the corner behind a crest or obstruction.
Corner Radius Transition Use smooth entry and exit transitions Progressive transitions Clothoid-style or similarly smooth transitions reduce abrupt steering changes, make the kart easier to control, and produce more predictable driver flow.
Track Edge Clearance Based on speed, barrier system, and local rules Engineered individually Do not use one clearance value for the entire circuit. Higher-speed corners and braking areas generally require more forgiving space than slow corners.
Runoff and Recovery Areas Typically 8–15 m where site conditions allow Wider at high-speed exits Runoff should be prioritized at corner exits, braking areas, and locations where a kart could leave the racing surface at speed. Final dimensions require a site-specific safety review.
Pit Lane Width 4–5 m for one-way kart movement 4.5 m Use a clearly separated, low-speed pit lane with controlled entry and exit points. Keep pit traffic from crossing the main racing line.
Pit Entry and Exit Separate merge and diverge zones Entry before a slow corner; exit after it Connecting the pit lane near a slow section reduces speed differences. Provide sightlines so drivers can recognize merging karts early.
Starting Grid On a straight of at least 50–70 m 60 m grid straight Keep the grid away from the first immediate apex where possible. A visible approach gives drivers time to settle into position before the start.
First Corner After the Start 45°–120° turn; generous entry width 90° medium-speed corner A medium-speed first corner is easier to supervise than an extremely tight hairpin and can accommodate several karts without forcing abrupt braking.
Overtaking Opportunities 2–4 clear zones per lap Three zones Place overtaking zones at the end of straights leading into slow or medium-speed corners. Avoid relying on only one passing location for the entire lap.
Driver Sightlines Visible approach to every major hazard No blind high-speed conflict points Use the layout, barrier alignment, marshal posts, and signage to maintain early visibility of stopped karts, merging traffic, and changing track direction.
Marshal Post Coverage At every major incident or blind-risk location Corner groups plus pit entry and exit Position posts where staff can see the relevant section and communicate with neighboring posts. Final spacing depends on visibility, circuit length, and operating procedures.
Drainage and Crossfall Designed by a civil engineer for the site Positive drainage without standing water Maintain a consistent surface that sheds water without creating abrupt crossfall changes in braking or cornering areas. Local stormwater requirements must be followed.
Lap-Time Target Approximately 45–75 seconds About 60 seconds A lap near one minute is long enough to reward learning and short enough to keep sessions easy to supervise. Actual time depends on kart performance and driver skill.
Traffic Capacity Set by track length, width, speed, and operating rules Use controlled session sizes Determine the maximum number of karts through operational testing, not track length alone. Separate slower and faster driver groups when appropriate.
Surface and Markings Uniform paved surface with high-visibility markings Consistent grip and clear edge lines Use durable markings for the racing edge, pit lane, grid, and hazard areas. Avoid sudden grip changes between repaired and original pavement.
Driver Flow Sequence Grid → start straight → braking zone → technical section → overtaking straight → pit return One continuous loop A balanced sequence alternates high-speed and low-speed sections, creates regular decision points, and returns drivers to the main straight without crossing opposing traffic.
Planning note: These values are preliminary design references for a single-level recreational kart track. Final geometry, barriers, runoff, capacity, drainage, accessibility, fire protection, and operating procedures must be verified against the site conditions and applicable local regulations.

Design Safety Zones, Barriers, Drainage, and Track Surfaces

How to Design a Single Level Go Kart Track?

A single-level go-kart track should make speed readable and hazards predictable. Begin with generous safety zones outside every corner, especially fast bends and braking areas. Use a clear buffer between the racing line and fixed structures. Gravel, grass, or compacted soil can absorb energy, but loose stones may enter the track. I prefer smooth, recoverable surfaces with no sharp edges.

Barriers need consistent height, strong anchoring, and controlled deflection. They should guide a kart away from danger, not launch it back into traffic. Leave access gaps for emergency teams and maintenance vehicles. Drainage deserves equal attention. Shape the track with subtle crossfall, then lead water toward protected channels. Avoid standing water near braking zones. A drain that works on paper may still clog with leaves and rubber debris. That mistake is easy to underestimate.

Tips: Walk the proposed layout after heavy rain. Mark puddles with paint. Test sightlines from a seated driver’s height. Keep warning signs visible, but never use them to replace physical protection. Choose a surface with predictable grip in dry and damp conditions. Abrasive pavement can improve braking, yet it increases tire wear. Smooth asphalt may feel safer, but poor texture can cause sliding. Consult a qualified track designer and local safety authority before construction. I would also review the plan with drivers, because drawings rarely reveal every blind approach.

Validate the Design Through Testing, Measurements, and Refinement

How to Design a Single Level Go Kart Track?

A convincing layout must survive measurement, not just look exciting on paper. During early testing, drive every corner at controlled speed and record entry speed, braking distance, lap time, and steering corrections. Our first draft felt smooth, but data exposed a blind braking zone. That was a useful failure.

Use the FIA Karting Circuit Regulations as a professional benchmark. The regulations identify 7 metres as the minimum track width for many circuit sections, subject to current approval requirements. Keep wider sections where overtaking, recovery, or queue merging occurs. Measure sight distance from the driver’s eye level, not from a drawing. The FIA Circuit Safety Guidelines also stress predictable runoff, barriers, and clear separation from hazards. These details matter more than decorative features.

Test with timing transponders, cone markers, and surface-speed checks. Compare five consecutive laps, then remove the fastest and slowest results. A 2023 U.S. Consumer Product Safety Commission report recorded more than 4,000 emergency-department-treated go-kart injuries in its surveillance sample, showing why small control problems deserve serious attention. Inspect tire marks, barrier contact points, drainage, and marshal visibility after every session. Refine one variable at a time. Do not widen every corner immediately. Sometimes the real problem is poor sight distance, inconsistent grip, or a braking point that arrives too quickly. Recheck the design after wet testing, too. Dry performance can be misleading.

This website uses cookies to ensure you get the best experience possible. Learn more.