The Ultimate Guide to Choosing the Best Enduro Bottom Bracket for Your Bike
In the ever-evolving world of mountain biking, selecting the right components is crucial for enhancing performance and ensuring durability. Among these components, the “enduro bottom bracket” plays a pivotal role in the overall functionality of a bike. According to a report by the International Mountain Bicycling Association, a poorly chosen bottom bracket can lead to increased wear and tear, ultimately affecting ride quality and safety on challenging trails. The report highlights that riders today are looking for longevity and responsiveness from their equipment, underscoring the importance of making informed choices.
Industry expert Dr. Ian Crouch, a prominent figure in cycling engineering, once stated, "The right enduro bottom bracket can make the difference between a smooth ride and a frustrating experience." As riders push their limits on technical terrains, they require components that can handle rigorous demands without compromising on efficiency. With a myriad of options available in the market, choosing the best enduro bottom bracket can be daunting. This guide aims to navigate you through essential factors to consider, ensuring you make an informed decision that elevates your biking experience while adhering to performance and durability standards.

Understanding Enduro Bottom Brackets: Key Features Explained
When choosing an Enduro bottom bracket, it's essential to understand the key features that make a difference in performance and compatibility. The primary components we should focus on include the shell width, bearing type, and the overall material construction. A properly matched shell width ensures that the bottom bracket fits seamlessly within your bike frame, while the bearing type—whether sealed, loose, or hybrid—affects both durability and smoothness during rides. Materials like aluminum or stainless steel play a vital role in weight and resilience, contributing to the bottom bracket’s longevity.
Tips: When selecting a bottom bracket, consider weighing the benefits of sealed bearings for protection against dirt and moisture, especially if you frequently ride in rough conditions. Additionally, keep in mind the torque specifications as exceeding these can lead to damage during installation. It's also important to check the compatibility with your crankset to avoid any issues down the line.
Another important feature is the installation method, as some bottom brackets require specific tools for fitting. Whether you opt for press-fit or threaded options will determine your installation experience. Understanding these differences can help you avoid complications later on and achieve optimal performance for your bike.
Tips: Always ensure that your bike frame is clean and free from debris before installation to prevent any alignment issues. Following manufacturer guidelines for lubrication and torque can also enhance the lifespan of your bottom bracket, making for a smoother ride and reducing the likelihood of maintenance interruptions.
Types of Enduro Bottom Brackets: A Comprehensive Overview
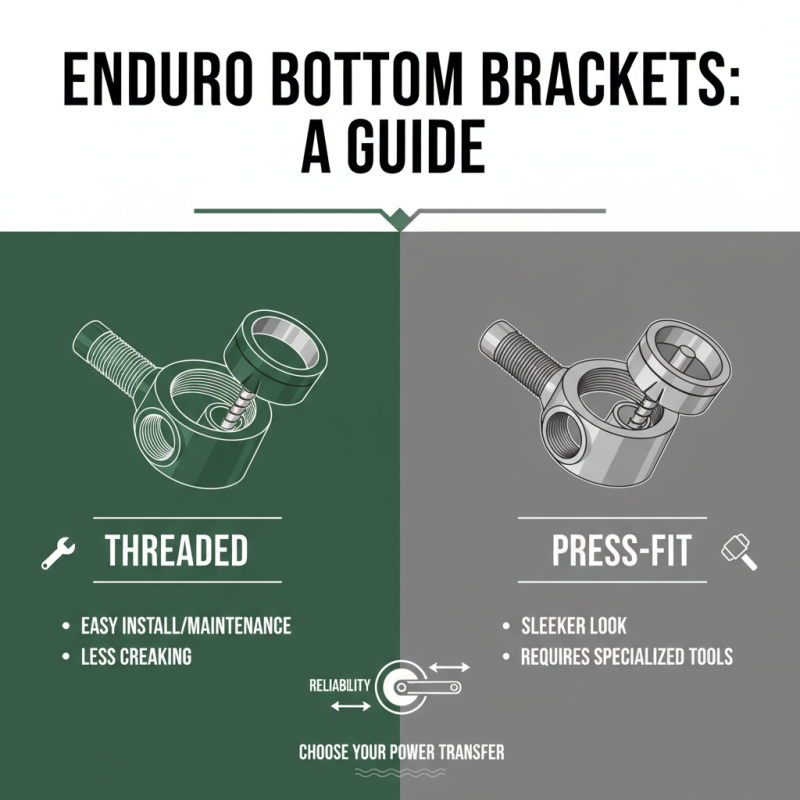
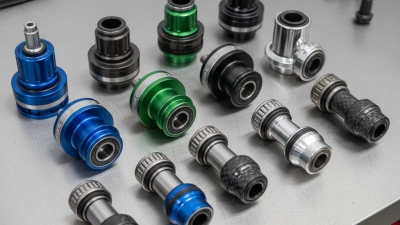
When selecting the best enduro bottom bracket for your bike, understanding the various types available is crucial. Enduro bottom brackets are essential components that influence ride quality and performance. They generally fall into two main categories: threaded and press-fit. Threaded bottom brackets are renowned for their ease of installation and maintenance. They utilize traditional threading to secure the cups into the frame, which can reduce the risk of creaking and create a tighter fit. This type is often favored by riders who prefer simpler servicing without the need for specialized tools.
On the other hand, press-fit bottom brackets offer a lightweight alternative that can improve frame stiffness. These brackets are installed using a pressing tool into the frame's designated shell, allowing for a wider variety of frame designs. Although press-fit options can sometimes lead to issues like movement or creaking if not installed correctly, they are increasingly popular due to their sleek design and potential for weight savings. When choosing between these types, consider factors like your bike's frame compatibility, the expected riding conditions, and the need for future maintenance. Each type of bottom bracket has its own merits, making it essential to select the one that best aligns with your cycling style and preferences.
Factors to Consider When Choosing an Enduro Bottom Bracket
When selecting the best enduro bottom bracket for your bike, several critical factors come into play. One of the most significant considerations is the compatibility with your bike frame and crankset. According to industry reports, approximately 30% of riders experience issues due to mismatched components, leading to inefficient power transfer and reduced overall performance. Ensuring that the bottom bracket specifications align with your crank spindle dimensions and shell width is essential for optimizing ride quality and durability.
Another important factor is the type of bearings used in the bottom bracket. High-quality bearings can significantly impact the lifespan and efficiency of the setup. A study published in the Journal of Sports Engineering found that riders using ceramic bearings reported a 7-10% increase in efficiency compared to those with standard steel bearings. Furthermore, the sealing mechanism and materials involved play a crucial role in preventing contamination from dirt and moisture, which can lead to premature wear. Riders should look for bottom brackets designed with robust sealing systems, as these can resist the harsh conditions often encountered in enduro riding.
Weight is also a consideration, as every gram counts when navigating challenging terrains. Industry data indicates that a lighter bottom bracket can enhance acceleration and climbing efficiency, an essential factor for competitive riders. Balancing weight, performance, and durability is crucial for achieving the best results in enduro biking, making thorough research and careful selection a necessity for any serious cyclist.
The Ultimate Guide to Choosing the Best Enduro Bottom Bracket
Choosing the right Enduro Bottom Bracket is crucial for enhancing your bike's performance. This chart compares various essential factors to consider when selecting a bottom bracket, including bearing type, material, weight, and price. This will help you make an informed decision.
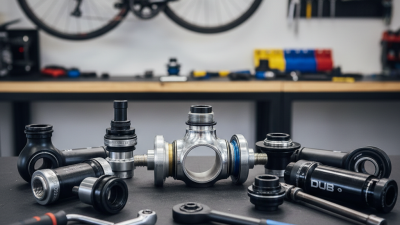
Installation Guide: How to Properly Install Your Bottom Bracket
Installing a bottom bracket is a crucial step in optimizing your bike's performance. To start, gather the necessary tools, including a bottom bracket tool, torque wrench, and grease. Ensure your bike is securely positioned on a stable workbench or bike stand. Begin by removing the crankset, which usually involves unscrewing the crank arms from the spindle. Take care to keep track of the screws and washers for reinstallation.
Once the crankset is removed, inspect the current bottom bracket for any wear or damage. Clean the shell thoroughly and apply a thin layer of grease to the threads of the new bottom bracket. This prevents seizing and makes future maintenance easier. Carefully thread the new bottom bracket into the shell, ensuring it's aligned correctly; cross-threading can lead to significant issues. Use the bottom bracket tool to tighten it to the manufacturer’s recommended torque specifications, making sure it’s secure but not overly tight to avoid damage.
Finally, once the bottom bracket is installed, reattach the crankset. Check that everything is lined up correctly and spins freely. After reassembly, it’s important to take a short test ride before hitting the trails to ensure everything is functioning smoothly. Proper installation not only enhances the performance of your bike but also extends the lifespan of your components.
The Ultimate Guide to Choosing the Best Enduro Bottom Bracket for Your Bike - Installation Guide
| Feature |
Description |
Considerations |
| Type |
ISO, BSA, Press-fit options |
Choose based on frame compatibility |
| Material |
Aluminum, Steel, Carbon Fiber |
Consider weight and durability |
| Bearing Type |
Sealed, Loose balls, Cartridge |
Assess maintenance and performance |
| Weight |
Varies between models |
Lightweight options can improve performance |
| Price Range |
$30 - $200+ |
Determine budget; high cost doesn't always equal quality |
| Maintenance |
Frequency of inspections and servicing required |
Choose a style that suits your maintenance preferences |
Maintenance Tips for Prolonging the Life of Your Enduro Bottom Bracket
Maintaining your enduro bottom bracket is crucial for ensuring optimal performance and longevity. Regular cleaning is one of the most important steps you can take. Start by removing any dirt and grime buildup around the bottom bracket area, which can lead to premature wear and tear. Use a soft brush and a degreaser to clean the surfaces effectively. Additionally, inspect the seals and bearings for any signs of wear; early detection of issues can save you from more extensive repairs down the line.
Lubrication plays a vital role in keeping your bottom bracket functioning smoothly. Applying the right type of lubricant to the bearings can significantly reduce friction and enhance performance. Be cautious to avoid over-lubricating, as this can attract dirt and debris, negating the benefits of lubrication. Consider performing this maintenance every few rides, particularly if you frequently ride in wet or muddy conditions, to ensure your bottom bracket remains in peak condition. Regular inspections and timely maintenance will help you enjoy a smoother ride and extend the life of your enduro bottom bracket.