What Is an Enduro Bottom Bracket?

An enduro bottom bracket is more than a set of bearings hidden inside a bicycle frame. It connects the crankset to the frame and supports smooth, efficient pedaling. The term usually refers to Enduro-branded bottom brackets, known for different bearing materials, seals, and shell configurations. However, riders sometimes use “enduro” to describe aggressive trail riding, which can create confusion.

Small details matter here. A bottom bracket must match the frame shell, crank spindle, bearing size, and installation method. Threaded, press-fit, and threaded press-fit systems do not share the same requirements. A 30 mm spindle will not automatically fit every frame. Check carefully. Incorrect spacing can produce creaking, rough rotation, or premature bearing wear.

Durability also depends on real riding conditions. Muddy water, pressure washing, sweat, and repeated impacts can challenge seals and bearing races. Enduro’s product options may include stainless steel or ceramic-hybrid bearings, but premium materials cannot correct poor installation. Clean contact surfaces, correct spacers, and measured torque remain essential. This is where workshop experience becomes valuable: a smooth bearing by hand can still fail quickly if the frame interface is damaged or misaligned.

This guide examines what an enduro bottom bracket does, how its designs differ, and how riders can choose the correct model. It also considers maintenance, installation risks, and common signs of failure. Some claims about “longer life” need caution. Riding style, weather, and service quality often matter just as much as the bearing material.
What Is an Enduro Bottom Bracket?

What an Enduro Bottom Bracket Is

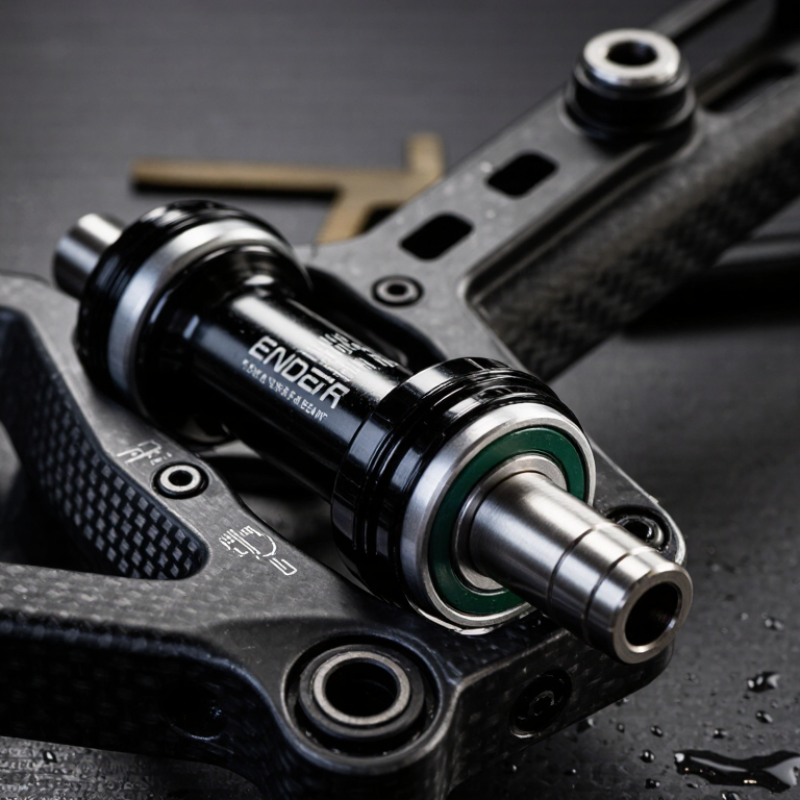
An Enduro bottom bracket is the bearing assembly installed between a bicycle frame and crankset. It supports the crank spindle and allows the cranks to rotate smoothly under pedaling force. The name may describe a product line, but the basic function remains the same. Its design must match the frame shell, spindle diameter, and installation method. Common versions use threaded or press-fit cups, with sealed cartridge bearings protecting the contact surfaces from water and dust.

In workshop checks, I look for side play, rough rotation, clicking, and unusual resistance. A healthy bottom bracket should turn quietly, without a gritty feeling. Remove the chain before testing it. This separates bearing noise from drivetrain tension. My first assumption was that every creak came from the bearings. That was wrong. Loose crank bolts, dry interfaces, and frame movement can create similar sounds. Accurate diagnosis requires patience, clean parts, and the correct torque values. Forcing a mismatched component can damage delicate threads or press-fit surfaces.

Tips: Confirm all measurements before ordering. Check the frame standard, spindle length, and bearing position. Use a calibrated torque wrench during installation. Apply only the lubricant recommended for the interface. If the crank still feels rough after fitting, stop riding and inspect the assembly. A small alignment error may become expensive. Also, record the removal order; I sometimes forget this detail, and reassembly becomes slower than expected.

How Its Bearings and Seals Are Designed

What Is an Enduro Bottom Bracket?

How Its Bearings and Seals Are Designed

An enduro bottom bracket is built for repeated impacts, mud, and long pedal loads. Its cartridge bearings usually sit inside a rigid cup or shell. The bearing races carry radial forces from pedaling and side loads from frame flex. Small differences matter.

Seal design controls how well the bearing survives outside contamination. A contact seal presses lightly against a rotating surface. It blocks water and grit but creates slight drag. A non-contact labyrinth seal leaves a narrow path for contaminants to cross. It spins freely, yet it needs better protection from pressure washing. No seal is perfect.

ISO 281:2007 defines L10 bearing life as one million revolutions at 90% reliability under rated conditions. Real cycling is harsher than that test model. Shock loads, poor alignment, and trapped moisture can shorten life. ISO 76 also evaluates static load capacity, including permanent raceway deformation. That detail is easy to overlook.

Tips: Check for side play before replacing the unit. After wet rides, wipe the shell and inspect seal edges. Avoid high-pressure water. A torque wrench helps prevent uneven cup loading. If rotation feels rough, do not assume the frame is at fault. Spacers, alignment, and preload deserve inspection. A quiet bearing can still hold moisture inside.

What Is an Enduro Bottom Bracket? How Its Bearings and Seals Are Designed

This chart compares standard bearing sizes commonly used in bicycle bottom-bracket applications. The listed bore, outside diameter, and width are standardized bearing dimensions. Larger bearings can provide more available contact area, while the seal design balances contamination protection against rotational friction. Contact seals generally provide stronger protection from water and dirt than non-contact shields.

How an Enduro Bottom Bracket Works in a Bicycle

What Is an Enduro Bottom Bracket?

How an Enduro Bottom Bracket Works in a Bicycle

An enduro bottom bracket connects the crank spindle to the bicycle frame. It lets the cranks rotate while supporting steady pedaling forces. Inside, sealed cartridge bearings sit around the spindle. Small steel balls reduce friction between rotating and stationary surfaces. The frame shell holds the assembly firmly in place.

When you pedal uphill, the bearings carry side loads and repeated pressure. When you sprint, the crankset can twist slightly under force. Proper bearing alignment helps prevent rough movement and unwanted noise. A clean seal also blocks water, dust, and muddy grit from reaching the bearing races. I have found that a smooth crank can still hide early bearing wear. That detail is easy to miss.

Tips: Check for play before every long ride. Hold both crank arms and move them sideways. Any clicking, grinding, or looseness deserves inspection. Keep the shell threads clean and use the correct spacer arrangement. Over-tightening can damage the bearings. Under-tightening can create movement. Bearing life also depends on riding conditions, not only mileage. After wet rides, wipe the crank area and inspect the seals. If rotation feels uneven, replace the bearing unit or seek qualified workshop advice. Specifications can differ, so confirm the frame shell and spindle standards before installation.

The Main Types of Enduro Bottom Brackets

What Is an Enduro Bottom Bracket?

An enduro bottom bracket supports the crank axle inside the bicycle frame. It uses sealed bearings to reduce friction and protect against water, dust, and trail grit. Fit matters more than marketing. A correctly installed unit should spin smoothly without side play or creaking.

The main types are threaded and press-fit bottom brackets.

Threaded systems screw into a metal or reinforced frame shell. They are easier to inspect and often simpler to replace at home. Press-fit systems sit directly inside the frame. They can save weight and allow wider shells, but frame tolerances become critical.

Common press-fit standards include BB86, BB92, PF30, and BB30. These names describe shell dimensions, not bearing quality.

Some frames use T47, a wider threaded format designed for modern crank axles. Bearing choices also vary. Stainless-steel bearings handle wet riding well and usually offer practical durability. Ceramic-hybrid bearings may reduce friction, but they cost more and still need clean seals.

I have found that a clean installation matters more than an expensive bearing upgrade. Light grease, correct spacers, and a calibrated torque wrench prevent many problems.

Press-fit cups can still creak when the frame shell is worn or slightly oversized. That is easy to overlook.

Check the axle standard, shell width, and manufacturer’s installation limits before ordering.

How to Choose and Maintain an Enduro Bottom Bracket

An enduro bottom bracket is built for repeated impacts, muddy descents, and heavy pedaling. It usually uses sealed cartridge bearings inside a threaded or press-fit shell. The correct choice starts with your frame standard, crank spindle diameter, and riding conditions. A small mismatch can create expensive damage.

The 2024 Outdoor Participation Trends Report recorded more than 50 million bicycle participants in the United States during 2023. That scale highlights a practical point: component life depends heavily on use, not only specifications. Choose stronger sealing for wet trails, frequent stream crossings, or winter riding. Choose low friction when your routes are dry and smoother. ISO 4210-2 provides bicycle safety requirements, but it does not replace correct installation or regular inspection.

Check for play by holding the crank and moving it sideways. Rough rotation is another warning. Remove the crank, clean the shell area, and inspect seals after muddy rides. Use the manufacturer’s specified torque, because overtightening can damage bearings or frame threads. I once ignored a faint clicking sound for several rides. The bearing eventually needed replacement.

Do not pressure-wash the bottom bracket area. Water can pass the seals. For press-fit systems, creaking may come from shell contamination, poor fit, or frame wear, not simply a failed bearing. Record installation dates and riding hours. That habit is imperfect, but it makes maintenance decisions less subjective.

What Is an Enduro Bottom Bracket? - How to Choose and Maintain an Enduro Bottom Bracket

Data Dimension Typical Data or Standard What It Means Selection or Maintenance Guidance
Bottom bracket function Supports the crank spindle and allows the crankset to rotate It connects the crankset to the frame while reducing rotational friction Confirm that the bearing layout and spindle interface match the crankset before purchase
Common construction Two sealed cartridge bearings, cups or press-fit shells, spacers, and seals Sealed bearings help limit the entry of water and dirt during normal riding Choose corrosion-resistant materials and effective seals for wet, muddy, or coastal conditions
Frame interface Threaded or press-fit Threaded units screw into the frame; press-fit units are installed into a precisely sized shell Never substitute one interface for the other; identify the frame standard first
Threaded shell standards BSA: 1.37 × 24 threads per inch; common shell widths include 68 mm and 73 mm The shell width and thread direction determine cup fitment Measure the shell and check the frame documentation; the right-hand cup normally uses a left-hand thread on BSA systems
Press-fit shell standards Examples include 41 mm internal diameter with 86.5 mm or 92 mm shell width, and 42 mm or 46 mm internal diameter systems Press-fit dimensions vary by frame design and crankset application Use a caliper or the frame manufacturer’s specification; incorrect dimensions can cause looseness, noise, or bearing damage
Spindle compatibility Common spindle diameters include approximately 24 mm, 28.99 mm, and 30 mm Bearing position and internal diameter must match the crank spindle Do not select a bottom bracket by frame shell alone; verify spindle diameter, length, seals, and required spacers
Bearing type Sealed radial cartridge bearings are common; ceramic or hybrid options are also available Bearing material affects weight, corrosion resistance, cost, and service life For most riders, good seals and correct installation are more important than ceramic construction
Riding environment Dry road, mixed conditions, wet commuting, muddy trails, or frequent stream crossings Water, grit, salt, and repeated pressure washing accelerate bearing wear Select stronger seals for harsh conditions and avoid directing a high-pressure water jet at the bearing area
Signs of wear Grinding, rough rotation, clicking, creaking, side play, or visible seal damage These symptoms can indicate bearing contamination, preload problems, loose cups, or frame-interface movement Check crank bolt torque, spacers, pedals, chainrings, and frame interfaces before replacing the bottom bracket
Routine inspection Every few rides in severe conditions; at least periodically during normal use Early inspection can identify contamination or looseness before major damage develops Remove the chain from the chainring, rotate the cranks by hand, and check for noise, resistance, or lateral movement
Cleaning method Low-pressure water, soft brush, mild bicycle cleaner, and a clean drying cloth Gentle cleaning removes surface contamination without forcing water past the seals Rinse lightly, dry thoroughly, and do not immerse or pressure-wash the bottom bracket area
Lubrication Grease on threads, contact surfaces, and approved seals during installation Correct lubrication reduces corrosion, creaking, and installation damage Do not pack external sealed bearings with unsuitable grease or spray lubricant; follow the component instructions
Installation accuracy Clean shell, correct spacers, aligned cups, and manufacturer-specified torque Misalignment or incorrect preload can shorten bearing life and create noise Use the correct installation tool and a calibrated torque wrench; press-fit parts must be inserted straight
Replacement decision Replace when bearings feel rough, have measurable play, remain noisy after adjustment, or show corrosion A bottom bracket is normally replaced rather than rebuilt when sealed cartridges are damaged Replace both sides as a matched service unless the design specifically permits separate bearing replacement
Best purchasing checklist Frame shell type, shell width, shell diameter, spindle size, crankset design, spacer arrangement, and riding conditions These specifications determine whether the part will fit and operate correctly Record all measurements before ordering and compare them with the technical specification of the replacement unit

This website uses cookies to ensure you get the best experience possible. Learn more.